Make a Scratch and Reveal Card
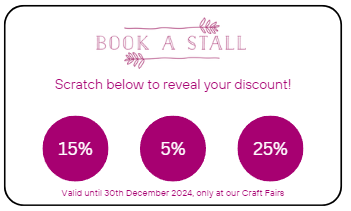
Scratch and Reveal cards are those lottery ticket scratch card type cards which reveal a hidden message when you scratch off the silver paint.
They are absolutely brilliant for sending out little promotional offers for your customers. You can include them in your orders to encourage repeat business. You can also have them at craft fairs for people to scratch off and reveal a discount that can be used there and then.
They are super simple to make yourself and can be really great at encouraging people to buy from you.
Firstly, you need a few things – some of which you might already have!
- Your cards with your promotions printed on them (we’ll take you through this step)
- Clear packing tape, or clear stickers (individual stickers are recommended)
- Silver acrylic paint
- Small paintbrush
1. Make your Scratch and Reveal Cards
Now, it’s important that if you are using individual clear stickers, that you know their exact size. You’ll be placing these stickers over your hidden messages later on, so you need to make sure that the sticker covers the message.
Consider what discounts you want to offer people and get designing your scratch and reveal cards! Remember to include your logo and company name so people know who has issued them.
Something really simple like this will work (which was done on Canva):
Just remember a couple of things:
- Add a “valid until” date
- Your discounts don’t need to be a simple % off – they could be free postage, or buy two items and get £5 off. It can be literally anything you like
- Make it clear where the discount can be used. If you are using it online, you’ll need to add your code within the circle
- Consider whether you want your scratch and reveal cards to be double sided. Perhaps you want to add your contact information on one side so that you can use them as normal business cards as well!
- Do you want to add a message which tells people that their Scratch and Reveal card is invalid if more than one discount is revealed?
If you are going to print them at home, make sure to use good quality card, and consider how you will cut them out. You might need to invest in a paper cutter if your scissor skills aren’t great. You could even have them printed out as business cards (Print Inc offer a deal on 100 business cards for just a few pounds).
2. Add Your Stickers/Tape
If you have chosen to use a roll or sheet of tape, you’ll need to cut out the shapes you need. This could be time consuming, but is the cheapest option. If you are really struggling, there’s nothing stopping you using a length of tape to just cover all of your discounts with one piece.
If you’re using a sheet of circular or square stickers you can place them on now (or you can paint them first – which we discuss next).
3. Apply Your Paint to your Scratch and Reveal Cards
Now, you can do this before the previous step if you are using a sheet of stickers which match the shape of your discount area. It will make the painting nice and neat when you peel your sticker off the sheet.
Wait until the paint has completely dried before you take them off. Test with one to make sure you can’t see the discounts through it. Most likely you will need three or four layers of the paint before they are completely non-transparent.
Tip: add a tiny amount of washing up liquid to your paint to give it a little bit of flexibility when you are peeling them off
Test one to make sure it works!
4. Done!
That’s it! They really couldn’t be simpler to make, and they will be amazing at getting your customers to buy from you again.
Adding one to each order will encourage your customers to buy again from you. Having a pile of them on your craft table at your next craft show will give your customers a little nudge to buy from you there and then! Just remember to take a couple of coins with you in case your customers don’t have any.